How to Customize Your WordPress Site: A Step-by-Step Guide
So you’ve started your WordPress blog, and you’ve selected a theme…
…but you don’t quite love how it looks.
Maybe it’s the size of the footer or the margin around the sidebar, but these small things feel off and make you uncomfortable.
Well, today, I’ll explain to you how I personally go about customizing and modifying my WordPress sites so that they look just how I want them to look.
1. Decide where you want to write your CSS
Option 1: Additional CSS
We all have seen the Additional CSS option in the Appearance ⇒ Customize section.
This opens up the following pane where you can write your CSS.

Option 2: Simple Custom CSS
Many WordPress bloggers seem to use other plugins such as Simple Custom CSS as a replacement to this Additional CSS option.
This is especially useful since the CSS you write inside Simple Custom CSS is associated with the plugin itself rather than the theme.
That means your CSS won’t be deleted when you change themes.
Simply go to Plugins ⇒ Add New and search for “Simple Custom CSS”.
Once activated, you can access the editor in Appearance ⇒ Custom CSS.

For the purpose of this article, I will use Option 1: Additional CSS to demonstrate my method.
2. Decide what you want to change
This is probably where most bloggers without programming experience get lost.
How do I change this specific element? There are so many different types of elements or “tags” as they call it: p tags, a tags, div tags, h1, h2, etc.
Well, the great thing here is that you don’t know need to know any of that. Of course, it’d be great to know, but not necessary at all.
Step 1: Open up your site in another tab.
We want to use another copy of the page to determine which elements to change.
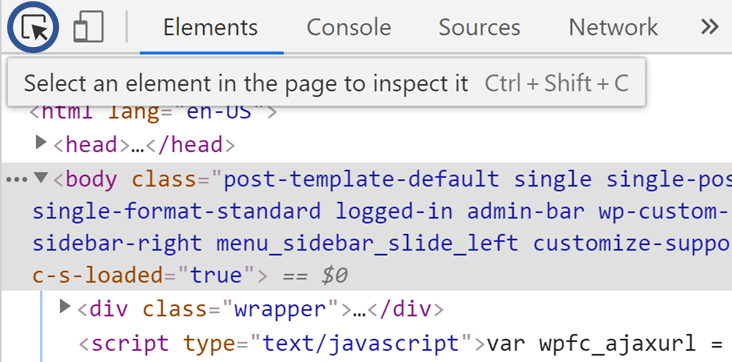
Step 2: Open up Developer Tools
We want to access the Developer Tools. I’m going to assume you’re currently on Chrome. If you’re on another browser, there is probably an alternative (Firefox, Safari, etc.)
On Windows and Linux machines, you can press Ctrl+Shift+C to access the Developer Tools.
On a Mac, you can press Command+Shift+C to access the Developer Tools.

3. Find the Element Identifier
So, you should have Developer Tools opened under the Elements tab.
You’ll notice that when you move your mouse cursor around, different boxes are getting highlighted with different colors. This means you’re in the Inspect Element mode.
If this isn’t happening, you can click this icon to get there.
In Inspect Element mode, we can obtain further information about each element, or section, of our webpage.
For example, when I hover over Recent Posts, this overlay pops up.
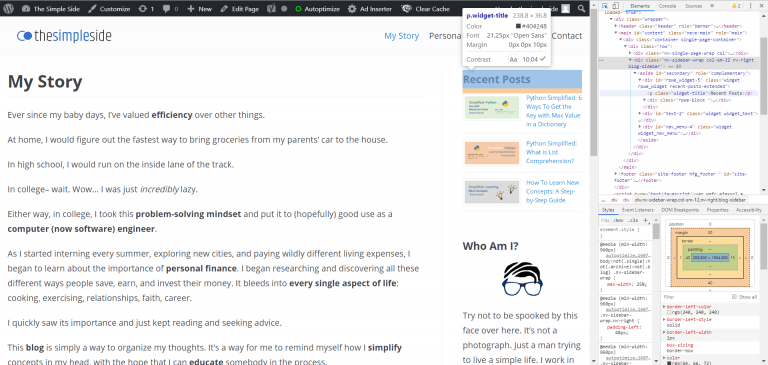
This popup tells me exactly what I need to modify the Recent Posts text.
Most importantly, it tells me that in the webpage, this specific section of text can be modified using the name p.widget-title.
Every element on the page has some sort of identifier, some longer and crazier than others. For example, these thumbnails in the right sidebar are called img.rpwe-alignleft.rpwe-thumb.
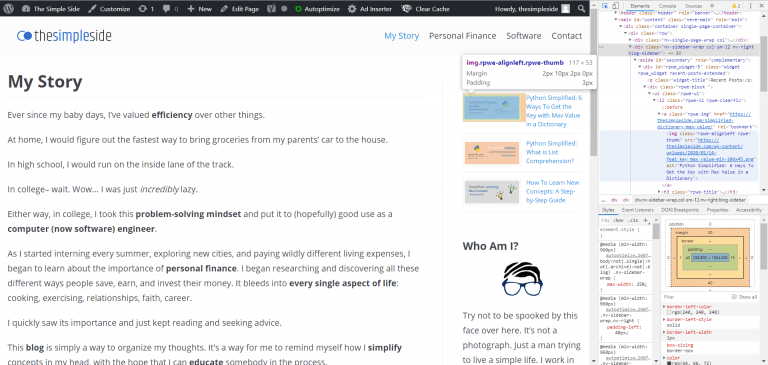
Who would’ve guessed that?
Whatever the name is, remember this identifier. It is quite important.
3. How do you want to change the element?
Let’s go back to Additional CSS (or whatever plugin you decide to use).
Suppose I wanted to center the Recent Posts text. I can do that as follows:
p.widget-title {
   text-align: center;
}
Suppose I wanted to add rounded corners to my thumbnails. I can do that like this:
img.rpwe-alignleft.rpwe-thumb {
   border-radius: 20px;
}

So, as you can see, the format of CSS styles is:
[element-identifier] {
   [style-property-to-change]: [amount-to-change];
}
I obviously can’t give you every possible change you can make here in this article, but whatever style change you want, there is a good chance it is possible.
Here are some articles listing the most common CSS properties to give you some ideas:
- Open Book Project: Common CSS Properties
- Zell: 9 Important CSS Properties You Must Know
- brinkje: Common CSS Attributes
For now, these are some basic changes you can make with CSS:
| Attribute | Description |
|---|---|
| margin | Change spacing between elements |
| padding | Change spacing within element border and its contents |
| border | Change border of an element |
| height | Change height of an element |
| width | Change width of an element |
| display | Change positioning and/or appearance of an item |
| color | Change color of text |
| background-color | Change background color of element |
More Things to Note
1. You Can Test CSS Styles Inside Developer Tools
After accessing the Developer Tools (Ctrl+Shift+C on Windows/Linux, Command+Shift+C on Mac), you can click on elements on your page.
In your Developer Tools, under Styles, there should be some text that says the following to the right:
element.style {

}
If you click inside this element.style {}, you should be able to type inside the two braces.
If you type in your own CSS style, it should automatically update on that page. This will only exist on that specific, local instance of the page, though. If you close the page or refresh it, those styles will be gone.
That is why this is a great way for developers to test out quick styles.
Once you have what you want, you can copy and paste those styles into your Additional CSS editor or the Simple Custom CSS plugin. You still need to manually type in the element identifier from Step 2.3.
2. You Can Only Change Styles, NOT Content
CSS stands for Cascading Style Sheets (it’s amazing how I never mentioned this earlier in the article).
It only modifies the style of the page, not the content. You generally will not use CSS to add or remove words from a page, just how it appears.
For example, I will not be using CSS to:
- Add labels to my navigation menu (modify Menu)
- Remove the word “Category: " when viewing a category (modify
.phpfile) - Add or Remove a widget from the sidebar (modify Sidebar)
However, I will most often use CSS to:
- Completely remove entire sections of the website if the theme doesn’t allow it (
display: none)- Anything you can select in Developer Tools (footers, metadata, etc.), you can remove entirely
- Change spacing between lines of text (
line-height) and text font (font-family,font-size,color, etc.) - Modify spacing between elements and within elements (
margin,padding, etc.) - Change all
h2to be blue (consistency)
Conclusion
Well, those are just the steps I take to modify my WordPress sites.
If you need help with CSS, I can refer you to some great articles on the topic. Just let me know!
I hope these steps were conveyed simply and thoroughly.
Good luck making your sites beautiful 😀